Photoshop Productivity Tip: Rounded Corners on Images
I had to ask my old colleague and friend Michael Bernth for help today for a Photoshop tip.
I wanted to round the corners of an image with the shape of a rounded rectangle.
Here is an easy way (I’m using Photoshop CS1):
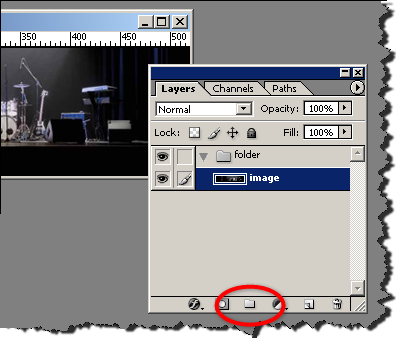
- Start with an image in a separate layer. Create a new set (folder), and put the image into it.
- Create the shape that will form the borders of the image. I’m using the “rounded rectangles tool”.
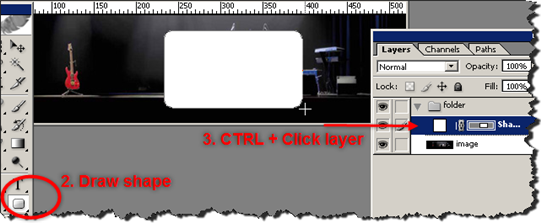
- CTRL + click the layer to select layer transparency
- Hide layer with shape, still preserving the selection
- Select the folder by clicking once on the set in layer list

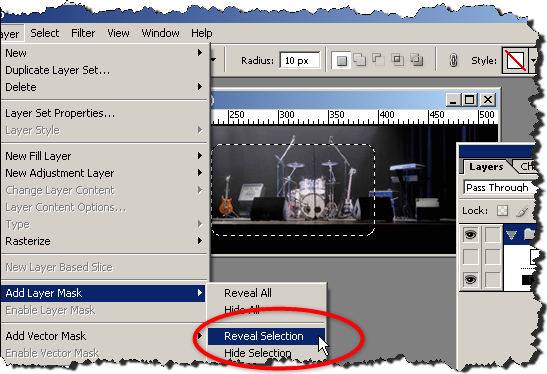
- Choose “Layer” > “Add layer mask” > “Reveal selection”
Finished result:
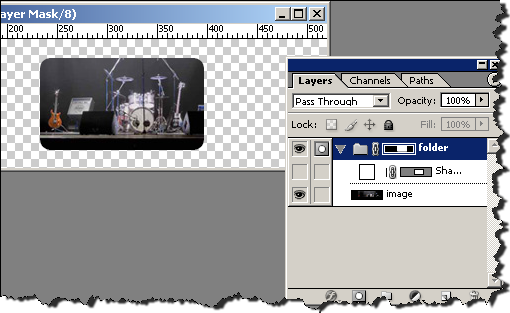
And voila! Now you can drop any image into the folder. You can move it around, copy, etc.
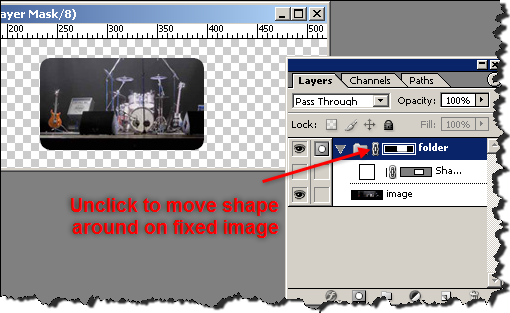
Another nice trick is to unclick the binding between the mask and the image. That way, you can move the mask around on a big image, to find just the right crop. (I felt like the start of a James Bond movie moving the mask around… :)
Technorati Tags: photoshop, productivity, tip, web, rounded corners, michaelbernth

July 29th, 2007 at 21:04 (GMT-1)
BTW, check out Michaels new startup Monovoce, if you are interested in web design in the Copenhagen area. It’s so new that we will have to wait till start of August for more details to appear on the website :)
July 30th, 2007 at 08:06 (GMT-1)
Good simple tip indeed
August 4th, 2007 at 16:21 (GMT-1)
With the possibility to apply a layer mask to a folder you are able to do a lot of really nice things, and you don’t have to limit yourself to simple shapes – try using alpha channels and the like. It is also possible to nest folders within folder, and thereby make some really advanced maskings. Have fun :)
August 10th, 2007 at 10:44 (GMT-1)
“Scaling masked images” in this 6 photoshop timesavers for webdesigners:
http://f6design.com/journal/2007/08/05/6-photoshop-time-savers-for-web-designers/
August 27th, 2007 at 13:36 (GMT-1)
Another tip i have been looking for in a long type: Create paragraph-style type that you can change with and height of so the text re-wraps.
Just click and drag to mark the placeholder of your text.
I used to just click, which makes the text so-called “point style” which means that if you change with/height of box, the type x and y-size changes.
I found this explanation deep in the help files of photoshop:
September 26th, 2007 at 21:18 (GMT-1)
Thanks for an easy to understand tutorial!
November 26th, 2007 at 19:59 (GMT-1)
Very nice and easy tutorial. I just tried it and it successfully worked without any trouble. Thank you so much.
January 1st, 2009 at 22:15 (GMT-1)
This is a great tutorial. Thank you. Do you know how to round the big image? I have a 193×60 jpg image, and I want to round it. Can you help me please?